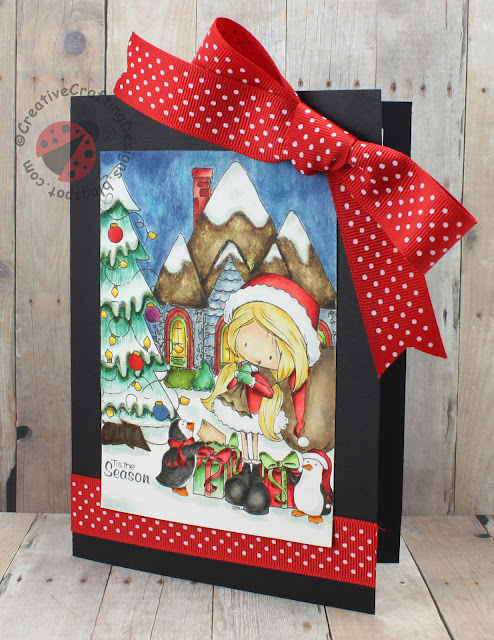
Happy Friday my crafty friends! There’s only two more weeks until Christmas. I only have a little bit of Christmas shopping let to do, how about y’all? Today I have another Christmas card to share with you that I created using Tiddly Inks digi stamp A Snowy Night.
I absolutely love this scene, it’s very pretty and has great detail. To start with I printed the image on Canson Watercolor Paper. Now the snow caps on the tree and roof of the house are not part of the stamp. I added the snow caps in by lightly painting in the lines of where I wanted them. I used Tim Holtz Distress Ink to paint this beautiful Christmas scene. When using the inks to paint I put some ink on an acrylic block and sprayed a small amount of water next to it, I wet my brush and run it through the ink; you don’t want the brush soak and wet. I paint a small about of ink on the the image then took another brush with water only (not soak and wet, just dip the very tip of the brush in the water) and used it to drag the ink out on my image. This technique has to be done several times to get the shadows you want (make sure the ink and water is dry before adding another layer). For the roof I first applied a light shade of brown ink and then add a darker brown on top. After the roof was completely dry I took some washi tape, crinkled it a bit, and stuck it to the roof. The washi tape pulled up some of the dark brown, showing only the light brown, creating a distressed aged look.
**Tip: When watercolor painting with Tim Holtz Distress Inks, the ink that is on the acrylic block does not completely dry. So, you can set your project aside and come back later, not having to worry about wasting ink. I actually would set everything aside and come back the following night to work on it and my ink that was on the acrylic block was still wet. Now, if you feel it is a bit dry just run a damp paint brush through the ink to reactivate it.
Ink Recipe:
~ Frayed Burlap ~ Crushed Olive ~ Squeezed Lemonade ~ Weathered Wood ~ Pumice Stone ~ Peeled Paint ~ Faded Jeans ~ Mustard Seed ~ Mowed Lawn ~ Tea Dye ~ Black Soot ~ Walnut Stain ~ Barn Door ~ Tumbled Glass ~ Stormy Sky ~ Peacock Feathers ~ Scattered Straw ~ Iced Spruce ~ Antique Linen ~ Pine Needle ~ Tattered Rose ~ Seedless Preserves ~ Fossilized Amber ~ Forest Moss ~ Gathered Twigs ~ Chipped Sapphire ~ Spiced Marmalade ~ Fired Brick ~ Rusty Hinge ~
After I was done painting this digi stamp I added some Crystal Snow ultra fine white glitter to all the shadows in the snow and some to the snow caps. I’m not sure if you can really tell in the picture but I promise it is there, lol. To apply the glitter I used Martha Stewert Glittering Glue. So, kind of a funny story.. While applying the glitter, I sat on the floor just in case I made a mess, I was so careful and didn’t make a mess until I was done, I knocked the entire thing of glitter over. Now, I will be cleaning up glitter for the next year, that stuff never seems to go away, lol. I also added a small amount of fine line detail to the image using a black Zig Millennium Pen .01
For the card base I kept it simple, just plain black Recollections Cardstock; cut out with my Cricut Explore. I feel that with all the detail and color in the digi stamp a plain simple card base is best. I accented my Snowy Night card by adding red polka dot ribbon. Don’t you just love the big bow?
I did add the sentiment “Tis the Season” to the left corner of the digi stamp. The stamp set is Christmas Wishes by Jade Blossom and I used Memento Tuxedo Black Ink.
Lets talk a little about the inside. I used my Cricut Explore to write the sweet sentiment “May the spirit of Christmas bring you peace, The gladness of Christmas give you hope, the warmth of Christmas grant you love.” I used the font Baby Steps in the has a writing style setting using a black Pilot Precise V5 black pen.
*So, I just noticed there is a misspelling. I wrote “spirt” not “spirit” Now, I have to figure out a way to remove that part of the card to redo it with out ruining it. I will say that this is something Cricut could upgrade on, there is no spell check in the text option, you can’t even type it somewhere else then copy and past into the text box on the Cricut Explore (if those options are available they are not working for me). Cricut, please make this change to Design Space. I can’t tell you how many times I made mistakes in the type that I did not catch until after it was on paper or on my card. What does everyone think about Cricut making this upgrade to Design Space?
~Thank you for stopping by Creative Crafting Designs, I hope you enjoyed my post~
Have a blessed and wonderful day!
Challenges Entered:


